3D Honeycomb Bike Saddle: Lightweight Shock-Absorbing Comfort

Lightweight 3D Honeycomb Bike Saddle with Shock Absorption: Comfort Without the Bulk
A comfortable saddle can change how long and how often a bike gets ridden. A lightweight 3D honeycomb design aims to spread pressure more evenly than traditional foam while adding built-in flex to take the edge off rough pavement and trail chatter. This guide breaks down what the honeycomb structure does, who it fits best, what to look for in sizing and setup, and how to get the most comfort from a shock-absorbing saddle.
What a 3D Honeycomb Saddle Does Differently
Traditional saddles rely on foam or gel that compresses as a single mass. A 3D honeycomb saddle uses a grid-like core designed to deform in many small zones at once. That matters because comfort problems often start as a few high-pressure points rather than a lack of cushioning everywhere.
- Pressure distribution: Honeycomb cores are designed to compress in many small zones, helping distribute load across a broader surface instead of creating a few pressure hotspots.
- Breathability: The open structure promotes airflow and quicker drying compared with solid foam, which can feel warmer on longer rides.
- Vibration damping: A shock-absorbing feel often comes from controlled flex in the saddle body and rails plus the honeycomb’s rebound, reducing high-frequency vibration from rough roads.
- Low-bulk support: Lightweight construction can help keep the bike’s overall weight down while still maintaining support for steady pedaling.
Who This Saddle Style Tends to Suit
Honeycomb saddles tend to feel more “supported” than “pillowy,” which can be a great match for riders who want comfort without a huge cruiser seat.
- Commuters and casual riders: A smoother ride over cracks, patched asphalt, and curb transitions—without adding a bulky comfort saddle.
- Fitness riders: A firmer, more stable platform than thick gel saddles, especially for steady cadence riding.
- Heat- and moisture-sensitive riders: More ventilation under the sit-bone area can help reduce that sticky, overheated feeling in warm weather.
- Anyone replacing a worn stock saddle: A practical comfort upgrade that typically doesn’t require changing the bike’s overall fit geometry.
Key Comfort Factors: Pressure Relief, Width, and Shape
The best material in the world can’t fix a poor match between saddle shape and body geometry. Comfort usually comes down to three things: correct width, a supportive rear platform, and a shape/relief design that reduces unwanted soft-tissue pressure.
- Width match: Saddle comfort starts with matching width to sit-bone spacing; too narrow concentrates pressure, while too wide can cause thigh rub.
- Rear support: A supportive rear platform helps carry most weight on the sit bones rather than soft tissue.
- Relief channel: A center channel or relief zone can reduce perineal pressure; small angle changes can significantly alter how that relief works.
- Surface feel: Surface texture matters: too grippy can cause chafing; too slick can lead to sliding and extra hand pressure.
Quick Fit Check for Saddle Comfort
| Checkpoint | What to Look For | Simple Adjustment |
|---|---|---|
| Width match | Sit bones feel supported on the rear platform | If pressure is centered or sharp, consider a wider size or different shape |
| Nose angle | No excessive forward slide or numbness | Start level; adjust 1–2° down only if needed |
| Fore-aft position | Knees track comfortably over pedals; no excessive reach | Slide saddle slightly forward/back in small increments |
| Height | Hips stay level; no rocking | Lower in 2–3 mm steps if rocking occurs |
| Chafing hotspots | No inner-thigh rub after 20–30 minutes | Confirm width/shape; check tilt and shorts fit |
Shock Absorption: What It Helps (and What It Can’t Fix)
“Shock absorption” on a saddle is mostly about reducing vibration and edge sharpness, not erasing every bump. Think of it as comfort insurance on rough pavement, chipseal, and mixed surfaces—not a replacement for good tires or a sound bike fit.
- It can reduce buzz and small impacts that build fatigue over time, especially on rigid bikes or higher tire pressures.
- It won’t fully replace proper tire choice, correct pressure, or suspension; big hits still travel through wheels and frame.
- If discomfort is caused by incorrect saddle height or reach, added cushioning may mask symptoms but won’t solve the root problem.
- For mixed surfaces, pairing a compliant saddle with appropriate tire width and pressure often produces the biggest comfort gains.
For a practical refresher on fit fundamentals, see International Bicycle Fund — Bike Fit Basics. For deeper saddle-specific background and common fit pitfalls, Sheldon Brown — Saddles is a helpful reference.
Setup Tips for a Smoother First Week
Even a great saddle can feel “wrong” if it’s installed a few millimeters off. The goal is to make changes slowly so it’s obvious what helped.
Care and Durability Expectations
Product Options Available Now
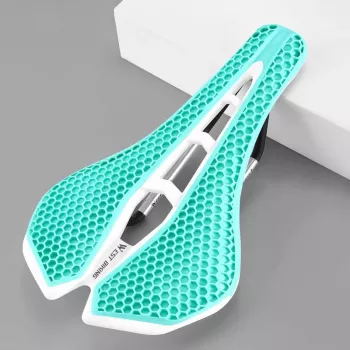
- Lightweight 3D Honeycomb Bike Saddle with Shock Absorption — lightweight 3D honeycomb construction aimed at balancing support and vibration-damping comfort, with improved breathability to reduce pressure buildup on longer rides.
- Dr. Martens Women’s Black Boots — a sturdy footwear option for riders who commute and walk in the same shoes after locking up (useful when comfort is about the whole trip, not only the saddle).
FAQ
Does a honeycomb saddle feel softer than gel?
It often feels more supportive than plush. Comfort usually comes from better pressure distribution and controlled flex rather than the deep “sink” sensation of thick gel.
How do you stop sliding forward on a new saddle?
Start with the saddle level, then adjust in tiny steps—about 1–2° nose-down only if needed. Also double-check height and reach, since a saddle set too high or a position that’s too stretched can push you forward.
Can shock-absorbing saddles reduce numbness?
They may help by reducing vibration and spreading load more evenly, but numbness often requires the right saddle width and tilt, and sometimes a relief channel or a broader fit adjustment.


Leave a comment