Electric Chainsaw Sharpener: Adjustable-Angle Chain Grinder
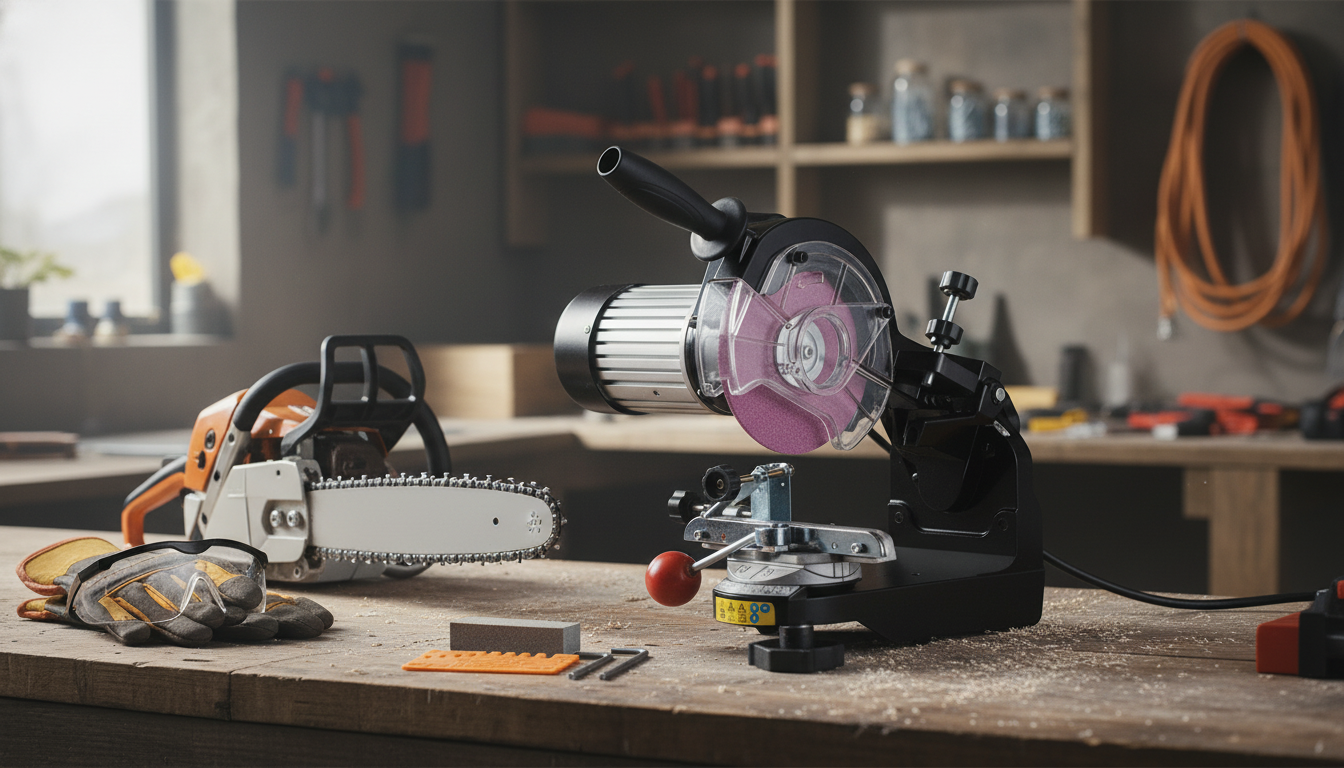
Electric Chainsaw Sharpener: Chain Grinder Power with Adjustable Angles
A sharp chain cuts faster, straighter, and with less strain on the saw. An electric sharpener with a chain grinder and adjustable angles helps repeat the same geometry tooth after tooth—useful for frequent cutting, multiple chains, or bringing damaged cutters back to a consistent edge. With stable clamping, repeatable settings, and light grinding passes, it’s easier to get predictable results than freehand filing alone. For more guidance, see [PDF] 1975 Special Chain Saw Section.
What an electric chain grinder does (and what it doesn’t)
An electric chain grinder is built to restore a consistent cutting edge across every cutter by removing metal with a grinding wheel rather than a hand file. That consistency matters when a chain has hit dirt or rock, or when you’re maintaining several chains and want repeatable results. For further reading, see Chainsaw sharpening with Harbor Freight electric sharpener.
- Restores the cutter’s edge by removing metal with a grinding wheel rather than a hand file.
- Helps keep tooth lengths uniform, improving straight tracking and reducing vibration.
- Adjustable angle settings make it easier to match common factory cutter angles.
- Not a substitute for chain inspection: cracked links, badly stretched chains, or damaged tie straps still require replacement.
Think of a grinder as a precision reset tool: it can bring cutters back to the same shape, but it can’t make a worn-out chain safe again. When you see cracks, damaged rivets, or the chain won’t tension properly, replacement is the safer choice.
Why adjustable angles matter for clean, efficient cutting
Angles are where chainsaw sharpening gets “make or break.” Even a chain that feels sharp by fingertip can cut poorly if the left and right cutters aren’t matched. Adjustable angles reduce guesswork and help keep both sides symmetrical.
- Top-plate angle influences how aggressively the cutter bites; too steep can increase chatter, too shallow can reduce cutting speed.
- Head/vice angle adjustments help match left- and right-hand cutters without guesswork.
- Consistent angle control reduces the “one side sharp, one side dull” problem that makes saws pull left or right.
- Angle accuracy is especially helpful when touching up multiple chains with different specs.
| Chain style (example) | Typical top-plate filing angle | Notes for grinder setup |
|---|---|---|
| Standard cross-cut chain | 25°–35° | Match the chain’s recommended angle; keep left/right cutters identical. |
| Low-kickback consumer chain | 25°–30° | Often benefits from lighter grinding passes to avoid overheating. |
| Ripping chain (milling) | 5°–15° | Designed for cutting along the grain; slower but smoother milling cuts. |
| Full chisel vs. semi chisel | Varies by model | Full chisel is more sensitive to angle errors; aim for consistency and minimal metal removal. |
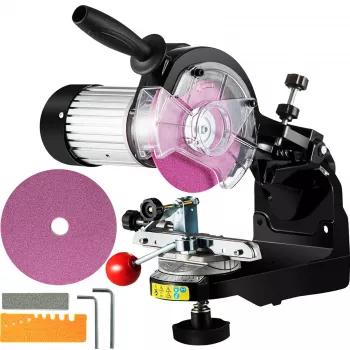
Key features to look for in a 230W adjustable-angle sharpener
Power helps, but consistency is the real win. A 230W-class grinder can handle routine sharpening, but the parts that reduce flex and keep settings repeatable are what make the results look “factory.”
- Stable base and vice: reduces flex so the wheel meets the cutter at the same point each time.
- Clear angle scales and positive stops: speeds up switching between left and right cutters.
- Depth stop (down-feed limit): prevents grinding too deep into the cutter and keeps tooth shapes consistent.
- Work light and shielding: improves visibility and helps control sparks and debris.
- Wheel compatibility: ensure replacement wheels are easy to source in appropriate thickness for the chain.
Small details add up: a smooth vise clamp, readable scales, and a reliable stop can mean the difference between “sharp enough” and a chain that tracks dead straight through a cut.
Setup basics: safe mounting, wheel check, and chain positioning
A grinder is only as accurate as its setup. Take a few minutes at the start to lock things down and confirm the wheel is in good shape.
For additional safety guidance around chainsaw work, see OSHA’s general recommendations for logging and chainsaw operations: https://www.osha.gov/etools/logging/chainsaws.
Step-by-step sharpening routine for consistent results
If you want to compare grinder technique to traditional filing basics, Oregon and STIHL both publish clear sharpening overviews: Oregon Products — How to Sharpen a Saw Chain and STIHL — Saw Chain Sharpening.
Fine-tuning: depth gauges, heat control, and troubleshooting
When an electric grinder is the right choice
Shop in-stock picks
- Electric Chainsaw Sharpener – 230W Chain Grinder with Adjustable Angles
- Modern Nightstand with Storage – 2 Fabric Drawers, Wood Top, Steel Frame
- Bamboo Breakfast Tray with Folding Legs for Sofa Bed, Adjustable Serving Laptop Desk
FAQ
What angle should the chain be sharpened at on an adjustable grinder?
Use the angle recommended for the specific chain model (often printed on the chain packaging or in the manufacturer guide). Many cross-cut chains fall in the 25°–35° range, while ripping chains for milling are commonly much lower. The main goal is matching the chain spec and keeping left/right cutters identical.
How many times can a chainsaw chain be sharpened with a grinder?
It depends on how much metal is removed per sharpening and how damaged the cutters are. Light, consistent touch-ups allow more sharpening cycles; aggressive grinding shortens chain life. Replace the chain when witness marks are reached, parts are cracked, or the chain can’t be tensioned properly.
Why does my chainsaw cut crooked after sharpening?
Crooked cutting usually comes from unequal cutter length or inconsistent angles between left and right cutters, or from uneven raker heights. Recheck the grinder angle settings, bring all cutters to a uniform length, and verify rakers with a depth gauge tool.


Leave a comment